How to correctly fill out a tax return on paper? Why doesn’t the tax office accept declarations filled out using samples on the Internet? These questions are especially relevant now, when it is necessary to report to the Federal Tax Service for 2020, including for ordinary individuals who are far from tax subtleties. Therefore, we will analyze the rules for filling out declarations manually on paper in 2020 using the example of the Federal Tax Service instructions for 3-NDFL.
Also see:
- Changes in the 3-NDFL declaration form from 2020: overview
Rules for filling out a declaration on paper
For most tax reports, there are options for submitting both electronically via TKS and on paper. At the same time, the regulatory document (usually an order from the Federal Tax Service) approving the current form of the report must also stipulate the rules for preparing it manually on paper.
This is necessary to unify the presentation of information on income (deductions) and to make machine reading of the report (declaration) possible. The basic rules for filling out a paper document for the tax office are the same in different orders.
If the declaration is not completed according to these rules, the tax office has every right not to accept it.
Often on websites specializing in accounting and tax topics, you can find user complaints that tax authorities did not accept a declaration made according to a sample downloaded from the site.
This happens because many resources focus on the practical aspects of the issue: how to collect data, how to calculate tax, in which lines of the declaration what information should be reflected. At the same time, special attention may not be paid to the order of registration itself.
So it turns out that, on the one hand, the declaration is filled out correctly (the necessary data is in the necessary cells and sheets), and on the other hand, it is filled out incorrectly (it is not completed in the way it should be for those who accept and process this declaration).
The procedure for filling out a tax return on paper is discussed in great detail in the Federal Tax Service order No. ММВ-7-11/569 dated October 3, 2018, which approves the 3-NDFL declaration form, relevant for the 2020 report.
Let's look at how to correctly fill out the declaration manually in 2020.
IMPORTANT!
If the declaration is generated in an Excel or Word file and then printed, this process is equivalent to filling it out by hand. That is, the same rules should apply.
How to fill out 3-NDFL - step-by-step instructions
Below are step-by-step instructions for filling out the 3-NDFL declaration. Pay attention to the sample filling and take into account all the nuances.
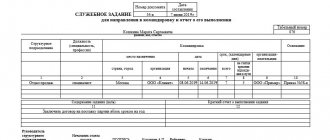
Step 1 – Enter your details in the title page
There are usually no questions when filling out the title page - in 3-NDFL everything is also quite simple and standard. What are we putting down? Let's move line by line:
- At the top of the sheet, fill in the TIN and page number in the “001” format - this must be done on all sheets of the declaration. On subsequent pages you still need to enter the surname and initials of the individual entrepreneur;
- We enter the correction number - during the initial submission we indicate “0—”;
- We indicate the code of the period for which we are reporting (i.e. the tax period), we put “34” - since the document is drawn up based on the results of the year;
- In the “tax period” column we put the year for which we are reporting (we will have “2018”) and the tax code in which we submit the declaration;
- Next, fill out the block of information about the taxpayer (in order to find the required values for the fields with codes, you should refer to the appendices of the order of the Federal Tax Service approving the form): Country code (according to the citizenship of the individual entrepreneur) - for citizens of the Russian Federation this code is “643”;
- Taxpayer category code (individual entrepreneurs are designated by the code “720”);
- Full name;
- Date and place of birth (as they say, “according to the passport”);
- The document type code for the passport is “21” (also look for codes in the appendices to the above order);
Please note that in the new declaration form, the address of the individual entrepreneur’s place of residence both in the Russian Federation and abroad is also not filled out on the title page, as was the case in the previous form!
That's all for the title! All that remains is the section for confirming the data - everything here is standard, as in any other declaration (for example, you can see how to fill out a declaration for the simplified tax system-Income). You do not touch the section for the tax official; it is filled out directly by the tax representative at the time of submitting the document.
A sample of filling out the 3-NDFL title page is presented below:
Step 2 – Set the indicators in APPENDIX 3
It is more convenient to fill out the sheets in reverse order. That is, first we will fill out Appendix 3, and then we will return to Section 2, and, finally, to Section 1. Do not forget that on each of these sheets you should put your TIN, page number, as well as your last name and initials.
Appendix 3 is intended to reflect income from business activities (this also includes lawyers / notaries / heads of peasant farms). We can say that the initial data for further calculation of income tax is entered here.
So, let’s first fill out the first group of indicators about the type of activity:
- In line 010 we put the activity code. We use the following conventions: 1 – will be for an individual entrepreneur;
- 2 – set by notaries;
- 3 – lawyers;
- 4 – arbitration managers;
- 5 – heads of peasant farms;
- 6 – other business activities
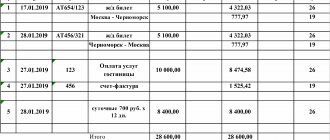
Next, we fill in the second group of indicators, which is information about the income and expenses of the individual entrepreneur:
- In line 030 we enter the amount of income for the year (in our example it will be 1,200,000 rubles);
- Line 040 should contain the amount of expenses for the year (note that this includes those expenses that can be taken into account when calculating personal income tax in accordance with the Tax Code of the Russian Federation, and not everything in a row) - in our example we will put 560 thousand rubles;
- Next, in lines 041-044 we give a breakdown of expenses: we divide the amount in line 041 into material expenses, 042 into depreciation, 043 into labor costs and 044 into other expenses. In our example, let 300 thousand rubles. – expenses for the purchase of materials, 260 thousand rubles. - other expenses. There are no fixed assets - no depreciation, individual entrepreneurs have no employees - no wages either;
Important! We fill out Appendix 3 (the first and second groups of indicators) for each type of activity, then in the first sheet of the completed ones we enter the final data in the third group of indicators.
Since in our example the entrepreneur was engaged in one type of activity, we proceed to filling out section 3 “Total” of this application. Here we proceed as follows:
- on line 050 we put the total amount of income received - 1,200,000 rubles;
- Line 060 displays the amount of professional tax deductions. In our case, expenses from doing business are documented, so we put 560,000 rubles in this line, duplicating line 040. If it is not possible to confirm expenses, then an individual entrepreneur can take advantage of a deduction of 20% of the amount of income received - line 030 * 0.20 .
Now let’s fill out the third group of indicators and summarize:
- On line 110 we calculate the total amount of income;
- On line 120 we calculate the total amount of expenses;
We have one type of activity, so we simply transfer data.
- In line 130 we enter the amount of advance payments accrued during the year - in our example, let it be 50 thousand rubles;
- On line 140 we write down the amount of advances that we actually paid during the year - in our example, let the entire amount of advances be paid on time.
Important! An individual entrepreneur for personal income tax can take into account all expenses as part of expenses, provided they comply with the norms of the Tax Code of the Russian Federation, or apply a professional deduction amounting to 20% of income. The second option is beneficial to use when actual expenses are small or when you cannot document expenses - without documents, the tax office will exclude them from the tax calculation during an audit.
Now let’s fill out the third group of indicators and summarize:
- On line 110 we calculate the total amount of income;
- On line 120 we calculate the total amount of expenses;
We have one type of activity, so we simply transfer data.
- In line 130 we enter the amount of advance payments accrued during the year - in our example, let it be 50 thousand rubles;
- On line 140 we write down the amount of advances that we actually paid during the year - in our example, let the entire amount of advances be paid on time.!! (DELETE) line 070 is intended to display the amount of advance payments paid. In our case, we bet 50,000 rubles.
That's all for this section. The fourth group of indicators is filled in if 3-NDFL is submitted by the head of the peasant farm - line 080, and lines 090 - 100 are filled in by those who adjusted the base and tax in accordance with the provisions of clause 6 of Art. 105.3 in case of application of prices that do not correspond to market prices in transactions with related parties.
Line 110 -150 is intended for those entrepreneurs who received income from other sources, which were deciphered in Appendices 1 and 2.
An example of filling out Sheet B is presented below:
Step 3 – Do the calculation in Section 2
In Section 2, we first enter the tax rate on line 001. In our example, this will be the standard 13%. If you report personal income tax at several rates, then you need to fill out a separate calculation for each. Then in line 002 we indicate the type of income, for us it is “3” - other. We do not consider dividends and income in the form of profits of controlled foreign companies and other situations in the example.
Next we go line by line:
- 010 – indicate the total amount of income (transfer the amount from line 110 of Sheet B);
- 020 – to be filled in if necessary, we have dashes;
- 030 – set the total amount of income (030 = 010 – 020), for us 010 = 030;
- 040 – enter the amount of the tax deduction – for us this is the amount from line 060 of Appendix 3;
- 050, 051 - filled in if necessary, we have dashes;
- 060 - we calculate the tax base - for us it is equal to the difference between lines 030 and 040 = 640 thousand rubles;
- 070 – we calculate the tax itself, in our example 070 = 060 * 13% = 83,200 rubles;
- Lines 080, 090, 100 – fill in if necessary. For example, if you are a trade tax payer, then you can reduce the tax by its amount; accordingly, we put it on line 100 - remembering that line 100 cannot be more than line 070, since we cannot reduce the tax more than we have it;
- 100 – the actual amount of actually paid personal income tax advances is entered (we transfer the data from line 070 of Appendix 3;
- lines 120, 130 and 140 are filled in if necessary;
- lines 150 and 160 contain data on tax payable or refund from the budget. In our case, the tax will be additionally paid (line 070 – 110) 83,200 – 50,000 = 33,200. In line 050 we put 33,200.
A sample of filling out Section 2 is presented below:
Step 4 – Compile the data in Section 1
In Section 1, we provide summary data for all sheets of the declaration, taking into account all types of activities and all rates. Our example is simple, so Section 2 is very easy to fill out:
- In line 010 we put the result code, we will have “1”, since the result is a tax payable to the budget;
- In line 020 we put the KBK, according to which the additional tax payment (or refund of its amounts) should be credited;
- In line 030 we put OKTMO;
- In line 040 we enter the amount of tax to be paid (we transfer the data from line 130 of Section 2;
- In line 050 we put dashes, since we do not have any amounts to be returned from the budget.
Important! If, on the contrary, we have identified a tax for refund from the budget (the result code in line 010 was set to “2”), then we put it on line 050, and we will have line 040 with dashes. If tax = 0, put the result code in line 010 as “3”, and cross out lines 040 and 050.
A sample of filling out Section 1 is presented below:
Current barcodes on paper form
Barcodes help tax officials not to manually transfer information from a paper declaration to a program, but to read it with a special scanner.
Some of this information is mandatory and is provided by mandatory barcodes.
The required barcode on the tax return is located in the upper left corner of the sheet.
IMPORTANT!
Tax authorities should not accept a report without the required barcodes relevant for the reporting period of the declaration.
Some software allows you to generate and print a paper declaration with additional barcodes.
An additional barcode may be located at the top right or bottom center of the declaration sheet.
Additional barcodes allow you to read more information using a scanner, without transferring it manually and without using Federal Tax Service tools for machine reading. Additional barcodes encrypt the data of the declaration itself, so tax authorities recommend and accept documents with additional codes much more readily.
But the inclusion of additional codes in the declaration is not mandatory. cannot refuse to accept a declaration without them
Barcodes are established by orders of the Federal Tax Service. For example, the current mandatory coding for the 3-NDFL declaration for 2020 was established by Order of the Federal Tax Service dated October 7, 2019 No. ММВ-7-11/506.
| Number in order | Name of section or application | Barcode | |
| In form for 2020 | In form 3-NDFL for 2020 | ||
| 1 | Title page | 03315019 | 03316016 |
| 2 | Section 1 | 03315026 | 03316023 |
| 3 | Section 2 | 03315033 | 03316030 |
| 4 | Annex 1 | 03315040 | 03316047 |
| 5 | Appendix 2 | 03315057 | 03316054 |
| 6 | Appendix 3 | 03315064 | 03316061 |
| 7 | Appendix 4 | 03315071 | 03316078 |
| 8 | Appendix 5 | 03315088 | 03316085 |
| 9 | Appendix 6 | 03315095 | 03316092 |
| 10 | Appendix 7 | 03315101 | 03316108 |
| 11 | Appendix 8 | 03315118 | 03316115 |
| 12 | Calculation to Appendix 1 | 03315125 | 03316122 |
| 13 | Calculation for Appendix 2 | 03315132 | 03316139 |
ADVICE
When downloading a form or sample declaration from a website on the Internet, we recommend checking that it contains valid barcodes so that the document can be accepted by the tax office without any problems.
To conclude the conversation about barcodes, let us add that they cannot be deformed in one way or another. For example, stitching a finished declaration with a stapler.
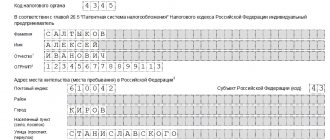
Code of the country
In the “Country code” field, indicate the code of the state of which the person submitting the declaration is a citizen. Determine the code yourself using the All-Russian Classifier of Countries of the World (OKSM), approved by Gosstandart Decree of December 14, 2001 529-ST. For Russian citizens, enter the code “643”. If a person does not have citizenship, indicate the code of the country that issued him an identity document.
Taxpayer category code
In the “Taxpayer Category Code” field, enter the code in accordance with Appendix No. 1 to the Procedure approved by Order of the Federal Tax Service of Russia dated December 24, 2014 No. ММВ-7-11/671. For an individual entrepreneur, enter “720” in this field, for individuals – “760”. Separate codes are provided for notaries, lawyers and heads of peasant (farm) households.
FULL NAME. and personal data
Please indicate your last name, first name and patronymic in full, without abbreviations, as in your passport. Writing in Latin letters is allowed only for foreigners (subclause 6, clause 3.2 of the Procedure approved by order of the Federal Tax Service of Russia dated December 24, 2014 No. ММВ-7-11/671).
At the top of each page you fill out, indicate your Taxpayer Identification Number, as well as your last name and initials. The TIN must be filled out if the declaration is submitted by an entrepreneur. Individuals may not fill out this field, in which case they will have to provide passport data (clause 1.10 and subclause 7 of clause 3.2 of the Procedure approved by order of the Federal Tax Service of Russia dated December 24, 2014 No. ММВ-7-11/671).
Taxpayer status
In this field you must indicate whether the citizen is a resident or non-resident of the Russian Federation.
If a citizen has been in Russia for more than 183 calendar days over the past 12 months, then he is a resident. In this case, indicate the number 1. If less, enter the number 2. Read the article on how to find out whether an individual is a resident or a non-resident.
Residence
In the “Place of residence of the taxpayer” field, enter the number 1 if you have a residence permit in Russia. If there is no registration, but there is registration at the place of residence, indicate the number 2.
Indicate the postcode, district, city, town, street, house, building and apartment number based on the entry in your passport or certificate of registration of residence. If you do not have a place of residence, please indicate your registered address at your place of residence. Take it from your residence registration certificate.
In the "Region" field, enter the region code. It can be determined using Appendix 3 to the Procedure approved by Order of the Federal Tax Service of Russia dated December 24, 2014 No. ММВ-7-11/671.
Such rules are established by subclause 9 of clause 3.2 of the Procedure approved by order of the Federal Tax Service of Russia dated December 24, 2014 No. ММВ-7-11/671.
The field “Residence address outside the territory of the Russian Federation” is filled in only by non-residents.
General requirements for filling out a tax return on paper
The paper tax return form must be filled out by hand or printed out. When filling, use blue or black ink.
Text fields must be filled in CAPITAL letters.
Each page of the declaration is printed on a separate sheet. Double-sided sheets are not allowed in the declaration submitted on paper .
Declaration (calculation) sheets must be located on one side of the sheet with a “Book” type orientation. Sheet format: A4 (210 mm × 297 mm). Margin sizes: minimum 5 mm.
It is highly advisable to use standard office paper with a density of 80 g/m2 for printing.
The declaration cannot be amended. If something needs to be corrected during the preparation of a document, you need to fill out/print out the necessary sheets again, immediately without errors.
Even partial loss of information on the declaration sheets when the sheets are stapled is not acceptable
How to fill out tax return fields manually
When filling out a paper declaration manually:
- Text and number fields are filled from left to right, starting from the leftmost cell (field). If there is no indicator, a dash is placed in all cells of the corresponding field.
If there are not enough characters for all the cells of the corresponding field, a dash is placed in the unfilled cells on the right side of the field.
- Numerical values, including fractions, are filled in according to the same rule: any field is filled out from the leftmost cell, and dashes are placed in the remaining free cells. The characters between cells are considered to separate one field from another. Let's look at this using the example of filling out a fraction in the 3-NDFL declaration:
- To record the date, 3 fields are used in order: day (two cells), month (two cells) and year (four cells). The fields are separated by a dot.
- Numerical data that forms the tax base (income, expenses, cost of something) can be entered into the declaration in rubles and kopecks.
An exception is income and expenses received or incurred outside the Russian Federation in foreign currency. Such amounts must be recalculated into rubles at the exchange rate of the Central Bank of the Russian Federation established on the date of receipt of income or incurrence of expenses.
- The tax amount is stated in the declaration only in full rubles. If the calculated amount is in kopecks, then a single rounding method is used: less than 50 kopecks are discarded, and 50 kopecks or more are rounded to the full ruble.
- If you enter too many indicators, exceeding the number of fields on the page, you need to fill out the required number of pages of the corresponding sheet. In this case, the final results are summarized only on the last of the added sheets.
- After filling out all the necessary pages, they must be numbered consecutively from the title page (the title page is the first page). There are 3 cells at the top of each sheet for the page number. And they are filled in according to slightly different rules than other numerical values.
So, the alignment of the numerical indicator is to the right. In unfilled cells, enter a zero. For example, the first page is numbered 001, the second - 002, and so on.
- At the bottom of each page (except for page 001 of the Title Page), in the field “I confirm the accuracy and completeness of the information indicated on this page,” the signature of the taxpayer or his representative, as well as the date of signing, is affixed.