A little history
The production of homemade passenger cars began several decades ago.
This activity gained particular popularity and distribution during the Soviet era. At that time, the production of exclusively mass-produced models was launched, which had many errors and shortcomings, as well as an almost complete lack of comfort. Therefore, Russian craftsmen created individual cars from a variety of available materials. Most often, a new car was assembled from several non-working old ones. Also, for towns and villages, ordinary passenger cars were converted into real trucks. To achieve this, the carrying capacity was increased and the body lengthened. There were models that easily overcame any water obstacles.
Such homemade products were not prohibited by law. Some restrictions were introduced only at the end of the USSR, but they practically did not interfere with personal production. There were a huge number of tricks and gaps in the laws, thanks to which many hundreds of handicraft machines were registered in those days.
What is required for a homemade car
Before assembling your own vehicle, you need to carefully consider every step and all the details of the work ahead. First you need to decide on the main purpose of creating the machine. The design itself and the capabilities of future transport depend on this. If you need a universal household assistant, capable of lifting significant loads and passing any obstacles, then you will need to stock up on special parts and materials, and also focus on a reinforced structure. When creating a model of a sports car or any other fashion car, you need to think about the appearance.
In addition, different components are needed to work with motorcycles, scooters and various trailers. However, in any case, a homemade car, created with your own hands, requires several wheels, sheets of steel, special bolts for metal structures, a steering wheel, transmission, screws, etc.
Pros and Cons of virtual car modernization
The introduction of such services made it possible to create completely new conceptual types of cars with significant savings in time and effort. If earlier, this kind of tuning was based on the trial and error method, now, with the availability of appropriate software, it becomes possible to implement any, the most ambitious solutions in the shortest possible time.
Thus, we can highlight a number of key advantages of virtual tuning:
- creating an interactive model taking into account actual parameters;
- constant updating of models and options;
- the ability to adjust a huge number of technical parameters;
- the ability to use non-standard methods and techniques.
In addition, despite their foreign origin, most of the presented programs are available in the Russian version, which greatly simplifies working with them.
Article on the topic: Marking of car tires and decoding of symbols
The disadvantages of virtual car modernization can only appear if the service user is not competent enough in the matter of tuning.
Sometimes, with excessive commitment to various kinds of innovations, a conceptual car design turns into something awkward. In addition, some programs are not of a high level of quality, which makes it difficult to select the appropriate components.
What materials are best to use
Designing a car is not an easy task.
The car must be safe for both the owner and others. Therefore, high-strength and wear-resistant materials should be used. In addition, we must not forget about comfort. Most often, craftsmen use metal and wood in construction. For equipment and comfort you need glass, plastic, various fabrics and leatherettes, rubber, etc.
Moreover, each specific housing material has its own disadvantages and advantages. For example, a homemade car made of wood will be much cheaper than the same one made of iron or plastic. It is known that until the early 40s, all transport frames were made of wood. But such material makes the car less safe, and it is also impractical and short-lived. In addition, the weight of such a vehicle is quite large.
It is easier and more practical to use various metal structures or corresponding elements of old cars.
How to make drawings correctly
Any serious project requires preparation. Therefore, before you start making any homemade car with your own hands, you need to draw a detailed plan and drawing of the future structure. You can use several sketches: a general view of the vehicle, as well as a detailed drawing of each element. To do this, you will need a large Whatman paper, pencils and an eraser, paints and rulers, as well as other office supplies.
The easiest way, knowing modern technologies, is to make drawings on a computer. In addition, there are many special programs for this, for example, Compass, Splan or AutoCADe. You can also make diagrams in Word. Each such application has its own characteristics and advantages.
Now you can create absolutely any homemade cars. Craftsmen present their drawings for public viewing. Then they can be printed in any convenient format.
Is it possible to make a car yourself?
Many drivers dream of having an original car that would stand out on the road and attract the attention of others.
Assembling a car yourself is not as easy as it might seem. But, nevertheless, if you ask the appropriate question, it is quite possible to get a good result that will pleasantly surprise both the future owner and other road users.
What you need to know to make a car with your own hands . Hardly anyone can call the process of creating a car simple and elementary. Therefore, a driver who decides to take up this business must, as a rule, be able to carry out many repair work, work with metal, welding, electrical work, and so on. The more knowledge and skills a driver who decides to create his own car has, the better.
Many people want to think that they are first-class jacks of all trades and can do everything on their own, without requiring help. This is sometimes the reason why a project drags on for too long. After all, what an experienced professional can do in a day, an amateur can do for a week, or even longer. For example, if you don’t know how to paint, then you can prepare the body for painting yourself, and take the car to a painter for painting. Or, covering the interior with upholstery material can be entrusted to specialists in this matter.
Workshop and tools . Ideally, have a warm workshop in which work can be carried out, regardless of the time of year, weather conditions and climatic features. In such a workshop it is comfortable and cozy, which means that everything will work out much better and faster.
Making a car with your own hands requires the necessary tools. Special devices and machines make the job faster and easier, but you can do without them. It is extremely difficult to compile a list of necessary tools; it all depends on individual characteristics, which are important to take into account.
The main conditions that are important when assembling a car include: - You must have a good workbench with a large vice - A full set of hand tools - A drill, or better yet a vertical drilling machine - A grinder - A welding machine - A compressor. For painting and for the operation of pneumatic tools. — Spray gun — Clamps of different sizes — Specialized hammers for shaping metal — Plate bending machine
How to make your own car from scratch . Starting work on creating a car with your own hands involves preparing all the elements and items that will be needed for the work. If the driver does not have something in advance, we can say that difficulties will arise that will complicate the process of repairing and assembling cars, delaying it in time.
You need to start assembling your own car with a plan, which is important to develop in advance and think through all the smallest details that are important. By sticking to it, you can quickly assemble a car that will move on the roads. Ideally, get a donor car, which will become a starting point and significantly simplify the procedure for assembling your car.
It is important to purchase a manual that matches the donor vehicle exactly. From it you can understand how not only the main components are arranged, but also important elements of the car, which you can initially simply forget about, losing sight of them.
Separate panels . Body panels can be created from multiple segments welded together. To do this, a wire frame is used as a basis (to control and maintain the shape), onto which all parts of the panel are welded. Depending on the size and shape, reinforcements may be added to the back of the panel. This method allows you to avoid molding complex panels using special molding machines.
Design and layout-basis . Designing your own car is an extremely enjoyable activity that also needs to be given attention. Only by developing an individual design, which must first of all be reflected in the layout, can you be sure that the machine will turn out as intended.
A computer (CAD or Alias program) can be used for design with further printing of full-scale drawings on a plotter. There are also ready-made templates for popular cars in electronic form, which can be purchased or found freely available on the Internet. In addition, there are companies that specialize in producing ready-made layouts. If desired, the driver can contact them and order a ready-made model of the future car.
Donor selection . The car that will be used by the donor must meet all the basic criteria that will allow it to be used as a basis. Several cars can be donors at the same time. It all depends on what kind of car is initially planned to be assembled.
The author of the car must understand that using cars from different segments as donors is not as easy as it might seem. The whole point is that in the end you get a single car. And if various machines are used for these purposes, then achieving the desired result is extremely difficult, if not impossible.
Fiberglass body . The advantages of a fiberglass body are light weight, low cost when produced in small quantities, and non-corrosion. The disadvantages are the low visual quality of the resulting surface, which requires further leveling; fiberglass cannot play the role of a load-bearing structure capable of withstanding significant loads, so it must be installed on a frame.
Painting . There is a lot of video and text material on preparing for painting. You can delegate the painting to other craftsmen, or do it yourself. The quality of painting depends 95% on correct, high-quality preparation. Paint will not hide surface irregularities and imperfections, but will only emphasize them.
Registration . In Russia, registering a homemade car is real. To do this, you need to go through a number of procedures. The machine will need to be certified in the laboratory of Rostekhregulirovaniya. You will need to provide technical documentation and drawings of a homemade car. The design of the car must comply with established technical requirements. Law enforcement officers will pay attention to the car’s dimensions, steering, braking system efficiency, and the operation of lighting equipment. Also, at the time of registration, check such indicators as the content of harmful substances in the exhaust. This is extremely important, especially considering modern security standards.
Bottom line . It can take quite a lot of time to assemble the machine. But only after completing all the steps can you contact the traffic police officers in order to register your car. Otherwise, it will be impossible to drive it on public roads. Or it may be confiscated and placed in a parking lot.
- Ten years of success. Report from
See all photo news >>
How to convert a personal car
Not everyone can design a completely new vehicle model, so most often one or more old, deregistered cars are used. In our country, these are usually “Zhiguli”, “Volga” or “Zaporozhets”. They are converted for different purposes: for children's carousels, transportation of heavy loads, driving in particularly dangerous conditions, etc.
Many car mechanics say that they start assembling a new car from scratch. First, they remake some elements of old personal cars, then add some new parts. And after that, a completely new model is designed. Very interesting are converted hybrids that can drive equally well on land as well as in snow or water.
Registering a homemade car
So, more than one month has passed, and you have finally designed and assembled your own homemade car. But in order to be able to ride it safely and unhindered, you must go through the registration procedure. And for this you need to take several difficult steps. It should be noted that only those cars that weigh more than 3.5 tons are subject to registration. Any semi-trailers and trailers, motorcycles and scooters are also registered.
Initially, the correctness and reliability of the machine design is checked. This is done by a special testing laboratory. Here the main parameters are checked, without which safe operation of the device is impossible. After carrying out the necessary tests, the owner is given an expert opinion. With these conclusions, as well as with official documents for the parts used in transport, you should contact the traffic police. Certification from the Institute for Highway Safety is also required.
The MREO receives a certificate confirming the absence of an identification number. To get a new one, you should contact the traffic police with your passport and all the documents received. Then, in your own car, you go to the MREO for final registration.
Automobile assembly plant (car production)
We present to your attention the project “Car Assembly Plant (Car Production)”.
The business plan is developed based on the actual data of the existing enterprise.
Highly qualified employees with experience in the industry took part in the creation of the project.
The business plan complies with international and Russian standards (UNIDO, TACIS, EBRD, MEDT of the Russian Federation, Ministry of Finance, Ministry of Construction, Ministry of Agriculture) and will adequately present your project in Russian and international banks, as well as government agencies at all levels.
If necessary, our company’s specialists will promptly make adjustments to the financial calculations and the descriptive part of the project in order to ensure full compliance of the business plan with your parameters.
The project is provided in the format of working files, which you can make changes to yourself or by qualified employees: a financial model (based on Excel) and a Word file (Powerpoint).
ASK A QUESTION
BUY A BUSINESS PLAN
Main project parameters:
Quantitative indicators: Assembly volume - 1000 pieces; area - 3 thousand sq.m.
Investment size:
- in dollars 3,112,442
- in euros 2,452,731
- in rubles 83,773,926
Project payback period, years: 2.0
Basic document parameters
- Number of pages – 49
- Number of charts – 18
- Number of tables – 23
1 SUMMARY
1.1 Project goals and objectives
The goal of the project: to organize the assembly production of cars of the “XXXX” family in the territory of XXXXX.
The assembly production is planned to be located on an area of 3 thousand square meters. m.
The total investment in the project will reach 3,112.4 thousand US dollars.
To achieve these goals, the following tasks must be solved:
- development and approval of project documentation;
- building construction;
- acquisition of necessary equipment, assembly and installation;
- office equipment;
- employee training;
- commissioning works;
- other costs;
- purchasing an initial supply of spare parts for assembly.
1.2 Project financing
Requirement for financial resources and financing structure
The need for financial resources for the project is 1,703.5 thousand US dollars.
It is planned that this project will be financed in full from raised funds.
Conditions for raising borrowed funds
To draw up this business plan, the following conditions for raising funds were accepted: the loan is provided for 42 months (3.5 years), for the period: 3 quarter. XXXX - 4 sq. XXXX year, the interest rate on the loan will be 15% per annum.
The loan is raised in stages, over 15 months (1.25 years: 3rd quarter of XXXX - 3rd quarter of XXXX), in accordance with the investment financing schedule.
Conditions for repayment of borrowed funds
Repayment of the loan is planned from the 19th month of the project, in tranches of an average of 212.9 thousand US dollars over 24 months (2 years: 1st quarter of XXXX - 4th quarter of XXXX).
Loan interest repayment
During the entire period of the project, interest is accrued and paid on the funds used. Interest accrued but not paid in the period before the launch of the project is repaid evenly along with current interest payments.
The amount of accrued interest for the period of using the loan will reach 524.7 thousand US dollars.
1.3 Project indicators
The economic viability of the project was confirmed by calculating traditional financial indicators used in project analysis.
The project calculation horizon is 84 months (7 years).
Table 1. Financial indicators of the project
| № | Indicator name | Indicator value |
| 1 | Project calculation horizon, years | 7 |
| 2 | Project calculation horizon, months. | 84 |
| 3 | Amount of capital invested in the project (LDC), USD | 3 112 442 |
| 4 | Revenue volume during the project period (SP), USD | 105 907 871 |
| 5 | Net average op. revenue per quarter (NAOR), USD | 1 022 226 |
| 6 | Average cash balance funds per quarter (ADB), USD | 2 382 792 |
| 7 | Net profit for the project period, USD | 19 639 016 |
| 8 | Net income (cash balance (NV)), USD | 19 639 016 |
| 9 | Average profitability over the project period | 18,5% |
| 10 | Discount rate (DR), % | 17,5% |
| 11 | Net Present Value (NPV), USD | 13 836 365 |
| 12 | Average Rate of Return (ARR) | 90,1% |
| 13 | Return on Capital Employed (ROI) | 631,0% |
| 14 | Profitability Index (PI) | 5,45 |
| 15 | Internal rate of return (IRR) | 358,1% |
| 16 | Modified ext. rate of return (MIRR) | 531,2% |
| 17 | Payback period (PBP), months. | 24 |
| 18 | Payback period (PBP), years | 2,0 |
| 19 | Discounted payback period (DPBP), months. | 24 |
| 20 | Discounted payback period (DPBP), years | 2,0 |
CONTENT
1 SUMMARY
1.1 Project goals and objectives 1.2 Project financing 1.3 Project indicators
2 PROJECT DESCRIPTION
2.1 General description of the project 2.2 Key performance indicators
3 BRIEF CHARACTERISTICS OF THE SALES AREA
3.1 Location and natural resources
Location Natural resources
3.2 Economic situation
Macroeconomic trends Investment policy Industrial development Reforms in the sphere of housing and communal services Trends in agricultural development Development of the consumer market, trade and paid services Foreign trade
3.3 Population and labor force
Population income Population expenditure
4 INVESTMENT PLAN
4.1 Size and directions of investment spending 4.2 Assessment of investment riskiness
5 ORGANIZATIONAL PLAN
5.1 Project implementation management (enterprise management) 5.2 Project implementation stages 5.3 Current project management
6 PRODUCTION PLAN
6.1 Activities and products generating income 6.2 Volume of production
Design capacity of the line Reaching planned production volumes
6.3 Structure of finished products
7 COMMERCIAL PLAN
7.1 Types of income received under the project 7.2 Pricing policy 7.3 Structure and volume of income
8 CURRENT PROJECT COSTS
8.1 Fixed costs
Operating expenses Depreciation
8.2 Variable costs
Direct costs of production Taxes
8.3 Project cost analysis 8.4 Marginal profitability analysis 8.5 Break-even point analysis
Assumptions in break-even analysis Break-even of operating activities Break-even analysis of the entire project
9 FINANCIAL PLAN
9.1 Conditions for attracting investment resources 9.2 Indicators of the cash flow plan 9.3 Indicators of the profit and loss plan 9.4 Financial indicators of the project
10 PROJECT RISK ANALYSIS
10.1 Factors influencing the company’s activities 10.2 Quantitative risk analysis
Sensitivity Analysis Conclusions
11 DESCRIPTION OF CALCULATION
11.1 Assumptions
Assumptions in break-even analysis
11.2 Project parameters 11.3 Calculation of project effectiveness criteria
12 LIST OF FIGURES AND TABLES
12.1 List of tables 12.2 List of figures
APPENDIX 1. SALES PLAN APPENDIX 2. FINANCIAL RESULTS OF THE PROJECT
Cash flow plan (Cash Flow, BDDS) Profit and loss plan (Statement of Earnings, Profit and Loss, BDR) Forecast balance (Balance, Statement of Financial Position) Calculation of payback and investment analysis indicators
1 LIST OF FIGURES AND TABLES
1.1 List of tables
Table 1. Financial and investment indicators of the project Table 2. Volume and purpose of areas for assembly production Table 3. Dynamics of average per capita cash income and consumer price index by quarter of XXXX Table 4. Structure of cash income of the population (according to the balance of cash income and expenses of the population ) Table 5. Cash income and expenses in the regions Table 6. Structure of cash expenses of the population (as a percentage of cash income) Table 7. Regional structure of cash income and expenses of the population Table 8. Investment budget Table 9. Calendar and financial plan Table 10. Staffing schedule with salaries Table 11. Structure of activities by area Table 12. Production plan Table 13. Cost of one assembled car (average for the project) Table 14. Structure of income by area of activity for the project period Table 15. Sales plan Table 16. Fixed costs Table 17 Variable costs Table 18. Analysis of the cost structure (in relation to revenue) Table 19. Analysis of the marginal profitability of the project Table 20. Schedule for obtaining and repaying the loan Table 21. Financial and investment indicators of the project Table 22. Impact of changes in individual parameters on the project performance indicators Table 23. Project sensitivity analysis
1.2 List of drawings
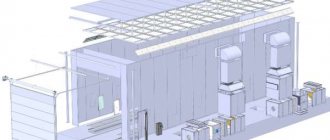
Figure 1. Structure of investment costs Figure 2. Schedule of financing investment costs Figure 3. Financing of investment costs on an accrual basis Figure 4. Reaching the planned volumes of income generation Figure 5. Growth in the number of assembled cars since the launch of the project Figure 6. Structure of activities by type Figure 7 Dynamics of sales revenue and direct costs, US dollars Figure 8. Revenue structure Figure 9. Structure of fixed costs (to the total volume of fixed costs) Figure 10. Structure of variable costs (to the total volume of variable costs) Figure 11. Structure of tax payments ( for the project period) Figure 12. The ratio of fixed and variable costs Figure 13. Cost structure (in relation to sales revenue) Figure 14. Break-even point without taking into account the tax component, USD Figure 15. Break-even point taking into account the tax component, USD USA Figure 16. Break-even point of the project as a whole, USD Figure 17. Cash flows for the project, USD Figure 18. Payback of the project, USD Figure 19. Approximate layout of the assembly line Figure 20. Exterior view of the premises
Do-it-yourself transport devices
Making a homemade car is just the beginning.
It is also necessary to create all the conditions for more comfortable and safe operation. You will need all kinds of lighting fixtures, fans, additional accessories, etc. For example, you can make a special starting device to start a car in the cold season. An industrial design will be good for your pocket, and a homemade device will help significantly save your family budget. To do this you will need transistors, switches, diodes, resistors, connecting wires, etc.
Individual anti-theft devices are also quite popular. Such homemade devices for cars help ensure the safety of the car in any conditions. The simplest one consists of just a single diode installed between the battery, toggle switch and voltage generator.
Some interesting facts about homemade products
Of course, in this area there were some extraordinary cases and episodes:
- The title of the lowest car belongs to the homemade Flatmobile. Its height is only 50 cm. You can only ride in it on flat and smooth asphalt.
- For lovers of modern vehicles, jewelry companies have created rings with patterns in the shape of various protectors. These products look quite original.
- Several British students have designed a homemade racing car. Its peculiarity lies not only in speed and design, but also in the engine, because it runs on hydrogen. This technique is absolutely safe for nature. These homemade mini-cars are designed for highways and cities.
- The first car of the legendary Henry Ford could not leave the creator's garage for a long time, because... had impressive dimensions. Only after breaking the wall, the master was able to take out the new item.
What's it like to be a car software developer? Part 1/2
When faced with the realities of the engineering industry, most software developers cannot cope - the products they have to work with are very highly specialized.
This is not creating programs for Internet users, computers, or even mobile applications, which is why beginners feel like Thomas from the movie “The Maze Runner.” Watch about 50 seconds of the trailer and you will understand the shock experienced by those who are dealing with software development for cars for the first time. All you have is a bunch of terms and tools that you have no idea about. When, during an interview at one automobile company, I asked what IDE they used, the interviewer, to put it mildly, did not like my question. I was used to Visual Studio, and naively hoped that something similar would be needed here for embedded software development. I had no idea what awaited me! Just a sea of small and serious (in terms of complexity) instruments that needed another victim. Moreover, when it comes to developing software for cars, tools are by no means the only problem. It is almost impossible to find literature for beginners or just training materials regarding libraries or the architecture of the corresponding programs. The term “textbook” sounds completely inappropriate, since the automotive industry is a very closed community. And you can hardly call it a community, because with such competition no one should guess how you create this or that program. To learn at least something about the individual tools and mechanisms of this segment of programming, you can enroll in prohibitively expensive courses, but your company must be prepared to shell out a considerable amount of money and it will take at least several weeks to gain the experience that you need now. It’s a pity that understanding the specifics of programming for the automotive industry is so difficult, and therefore I decided to devote my article to this topic.
Having repeatedly switched from creating applications for Internet users/computers to developing embedded programs and back again, I know first-hand the problems that newbies face when dealing primarily with the first block of products. Similar difficulties arise for programmers who have never encountered the specifics of the automotive industry.
In this and the next article, I would like to talk about the principles of operation of embedded programs for cars, as well as look into the depths of the exotic architecture of embedded applications.
What topics will we cover?
- How does embedded software improve vehicle performance?
- How do built-in apps help you control your car?
- What are the typical CPU limits?
- How does embedded software enable continuous processing of sensor data?
- How is this software structured and how do the individual applications interact with each other to control the car?
I'll answer these questions with a concrete example, while also providing an overview of embedded software architecture design.
We'll take the fully electronic steering system as an example. This is not a real model, but its structure is basically similar to what you most likely saw in your car. We'll talk in more detail about the architecture, and then move on to a simplified diagram that reveals the essence of the system's functionality. You can watch a video about the development of an electronic steering system. By the way, I also worked on this team.
This model is partially controlled by software. Partially this means that specialized software only helps the driver, but he has full control over the system.
Let's say we want to create a completely electronic steering system in which the steering wheel is not directly connected to the wheels. Instead, the sensor measures the steering angle and sends the resulting data to our program. In automotive terminology, this is a servo. Believe it or not, thanks to Nissan there is already a model with a servo drive on the market.
The software is run by a tiny processor or, more precisely, a microcontroller connected to the sensor via a network.
When the driver turns the steering wheel, thanks to a sensor that constantly transmits information about the current angle of rotation, the software receives a corresponding signal. For example, if the driver turns the steering wheel 90° to the right, within a second the sensor signal is processed according to the following principle:
In addition, the software also controls the operation of the electric motor, which moves the rack from left to right and in the opposite direction, which means that the angle of rotation of the front wheels of the car changes. Accordingly, the software can direct the car left or right. Communication between the microcontroller running the software and the electric motor is ensured thanks to an electronic control unit (ECU), which includes the microcontroller itself and a power amplifier that regulates the motor power supply system. Thus, our program varies the current supply to the motor and the position of the rack changes in the desired direction.
Electronic control unit (ECU)
Provided that the built-in software is working correctly, turning the steering wheel changes the position of the rack almost instantly.
Steering wheel - blue, steering rack - pink (approx.)
It becomes clear that even the processing of information here is not subject to either the logic of event-driven programming, as is the case with familiar GUI applications, or the laws of batch files. Instead, continuous, timely processing of incoming data is required. If the program takes too long to analyze the sensors, the car's steering rack and front wheels will move with a delay, and the driver will notice. Most likely, in an extreme situation this will lead to loss of control over the car.
, for example, when turning the steering wheel to avoid an obstacle, the car will not immediately respond to the maneuver. This specificity increases the requirements for the timing of programs for cars, especially if we take into account the limited performance of the processor of standard electronic control units.
As we continue this series, we'll look at software architectures that address these issues, and hopefully help aspiring automotive embedded application developers get up to speed on the fundamentals of the industry.